USA TRAVEL GUIDE
Philadelphia Skyline Photography from South Street Bridge
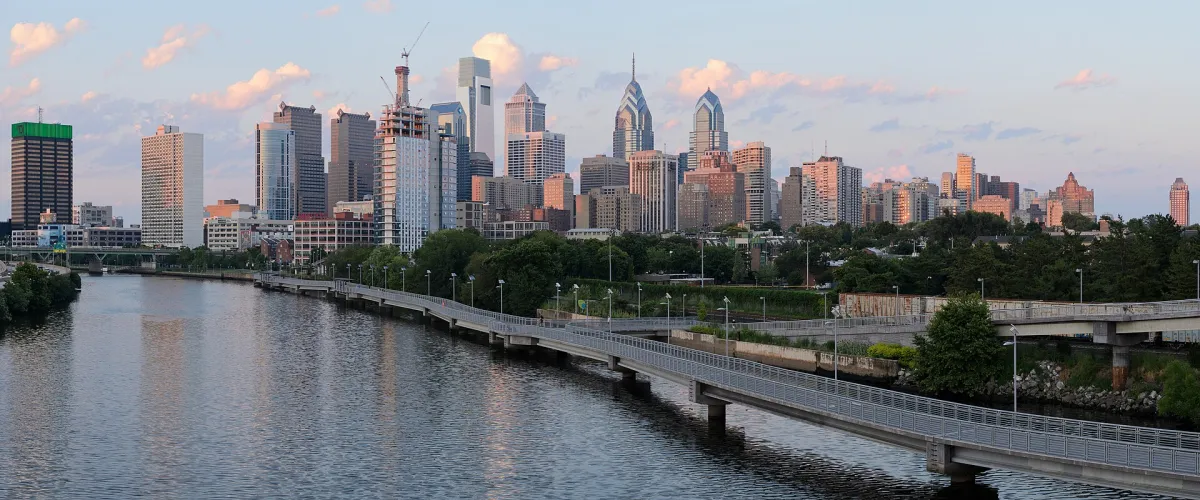
Philadelphia’s skyline rises behind the Schuylkill River in this four-segment panorama made from South Street Bridge on 23 July 2016. The source’s viewpoint and stitched construction are both documented. They explain the photograph’s wide field of view without implying that it was captured with one particular lens. Use it to study the relationship between river, crossing and skyline, rather than as a present-day building inventory.
Use the river to organise the panorama
The river gives the skyline a foreground and separates the viewer from the concentration of buildings. The bridge and shoreline introduce diagonals that prevent the city from reading as a flat strip. Notice where those lines meet the skyline and whether they guide attention towards the intended centre or lead it out of the frame.
A panorama needs deliberate edges. Compare what happens when a crossing is cut midway or a bright building sits immediately against the border. Sometimes a slightly narrower view is clearer than the widest possible stitch. If you make multiple overlapping frames, avoid changing your position between them: nearby railings and moving boats can reveal awkward joins even when the distant skyline appears aligned.
The supplied photograph is already a four-segment work. Keep its original creator and licence with the image, and do not describe it as a new single-frame photograph made by Photos4Travel. A natural wide display preserves its intended relationships; stretching it into a taller shape would distort both buildings and river.
Review the four-part panorama as a single finished image
A successful stitched panorama should read as one composition rather than a row of adjacent views. In this reference, the river and skyline provide continuity across the width. Before considering small details, follow the main horizontal and diagonal lines from one end to the other. Check whether the city has a clear visual centre and whether the two ends feel intentionally finished. A very wide image can be technically complete yet still contain more empty space than the subject needs.
When making your own overlapping sequence, pay attention to subjects that move between frames. Water, vessels and people may change while the distant buildings remain still. This does not prevent a panorama, but it gives you another reason to keep the composition straightforward and to review the finished result carefully. The source identifies four segments; it does not establish a particular lens, stitching method or camera setting, and none is claimed here.
Try a second, narrower view before leaving. It may concentrate the relationship between a river crossing and a group of towers more effectively than the full panorama. Later, compare the two at the intended display size. The broad version can explain the skyline’s extent, while the narrower one may show architectural relationships more clearly. Retain the creator’s attribution and describe any changes honestly rather than treating a crop as a new original work.
Choose the bridge level or the riverside level
The elevated bridge perspective reveals a different arrangement from the boardwalk below. From the bridge, the water and shoreline can lead into the skyline. At river level, nearby paths, railings and people become more prominent. Decide whether you want a city panorama or a photograph describing the experience of walking beside the Schuylkill.
Schuylkill Banks identifies an accessible ramp on the northeast side of South Street Bridge, linking it to the Boardwalk. The same authority describes the Boardwalk’s widened overlooks along the river. These are useful route-planning details, but current notices should still guide which sections you can use during your visit.
Stairs and a ramp are different access choices. If step-free access matters, check the specific approach rather than assuming that the most visible entrance is suitable. Keep the ramp clear and follow the operator’s instruction to walk bicycles there. Stop for photographs in a place that does not block movement between bridge and waterfront.
Plan a sequence as the light changes
In a river panorama, bright reflections may become as noticeable as the buildings. Look at the foreground as well as the skyline before taking the photograph. If a reflection dominates, try a small authorised change in position or a tighter composition. The aim is to create an intentional relationship, not to remove every sign of an active city.
A daytime image can reveal building and riverbank detail; a later scene may emphasise illumination and reflections. Choose the result you want rather than treating one hour as universally best. Weather can flatten the distant skyline while leaving interesting shapes close to the river. A boardwalk detail may be a productive alternative when a long panorama lacks separation.
For variety, make one skyline overview, one smaller group of towers and one frame explaining the river corridor. Give each image a distinct purpose. Repeatedly cropping this reference would not create that range, and a 2016 source cannot confirm today’s construction, vegetation or temporary access arrangements.
Use height changes to create genuinely different photographs
Before changing levels, identify the specific relationship you want to alter. In the reference, the boardwalk runs diagonally from the lower right towards the city, with its supports and dark reflections visible in the water. That continuous line is part of what the bridge-level photograph explains. A river-level composition can instead study one support, a stretch of railing or the meeting between path and bank. Choose that smaller subject before going down, then compare the result with the panorama rather than expecting the lower position to provide the same foreground. This gives the extra walk a photographic purpose.
If you use the ramp connection, keep it as a route rather than a place to spread out equipment. The operator identifies it as an accessible link, so other visitors may be relying on the clear passage. Choose a suitable stopping area once you reach the level you want. Check current notices before deciding how far to continue; a historical photograph and a general boardwalk description do not confirm the condition of every connecting section.
Finish with a manageable return plan. A photographer can spend considerable time comparing small changes in reflection or skyline overlap, which makes an outing longer than its walking distance suggests. Agree on a meeting place if your group separates and avoid reviewing photographs while crossing an active route. The aim is a small set that explains the river corridor from distinct authorised positions, with the source’s July 2016 panorama serving as a clearly dated reference.
Keep a practical riverside return route
Photography often takes longer than an ordinary walk because you pause to compare angles. Choose a manageable section and check your return route before waiting for evening light. Review the official Boardwalk information and current trail notices rather than assuming that every riverside connection remains unchanged.
At a busy time, make the image from a suitable stopping place and step aside before reviewing it. Keep equipment out of cycling and walking routes, and do not climb railings for a lower angle. The useful photographic challenge here is to organise the river and skyline from an authorised position, not to reach the closest possible point to the water.
Continue planning your USA trip
Sources and further reading
FAQ
Is this a single-frame panorama?
The source identifies a four-segment panorama made from South Street Bridge in July 2016. That provenance is retained rather than replaced with invented camera details.
Is there a ramp between the bridge and Boardwalk?
Schuylkill Banks identifies an accessible ramp on the northeast side of the bridge. Check current notices and the exact approach for your visit.
Will the current skyline look identical?
Not necessarily. Buildings, riverbank works and vegetation can change. The reference is a dated study of the river-to-skyline relationship.