USA TRAVEL GUIDE
Golden Gate Bridge Photography from the North Side
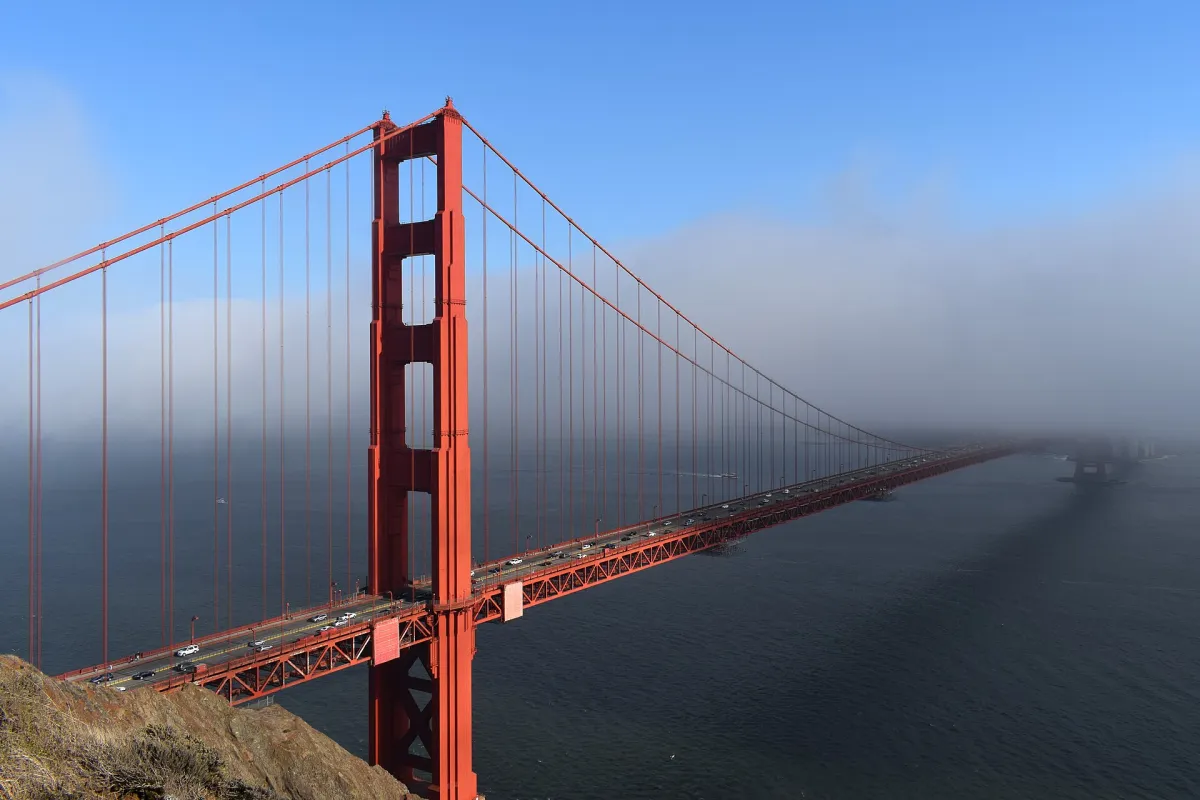
The north-side view of the Golden Gate Bridge places its towers and suspension cables in a strong diagonal arrangement above the water. In this photograph from 24 August 2019, fog softens part of the background while the nearer orange-red tower remains distinct. The useful photographic question is how much of the bridge to show and how to make changing visibility part of the composition.
Read the diagonal before the individual tower
The nearer tower establishes height, but the road deck and cables give the picture its direction. Follow them through the frame and notice how the more distant structure becomes less prominent. That progression creates depth. A photograph concentrating only on the closest tower would describe a different subject: structural detail rather than the bridge’s passage across the strait.
Keep a little room around the top of the nearest tower and check where the deck leaves the frame. A slight change of viewpoint can separate cable lines from the background or make them overlap. Make that choice deliberately. The source identifies a north-side view, but this page does not invent a precise roadside turnout or standing position that its metadata does not establish.
Compare three ways of framing the same bridge
A complete bridge view, a tower-and-cables study and a bridge-with-coastline composition answer different questions. The first describes the crossing; the second explains its construction visually; the third places it in a wider landscape. Begin by deciding which question interests you. The illustrated north-side frame combines the nearer tower with a receding deck, so its depth comes from the relationship between those elements. Removing the distant part would make the photograph more concentrated but would also change its story.
Look closely at the gaps between cable lines. Against a pale sky they can remain distinct; against a detailed hillside they may become harder to read. Check whether the nearest tower overlaps an important background shape and whether that overlap helps explain distance or simply adds confusion. A modest change of framing may be enough to separate the forms. You can make that comparison from a suitable public position without pursuing a particular unverified turnout.
Then compare the photograph at the size at which it will be seen. In a small image, a long thin bridge may lose its structural detail, while a closer tower arrangement remains readable. A large display can support more coastline and water. Keep both possibilities in mind before choosing a final frame, and retain the bridge’s proportions. A tighter image is useful when it has a clear purpose; it is not automatically an improvement merely because the nearest tower looks larger.
Treat fog as a changing visual element
Fog can simplify a busy background, separate the towers or conceal the bridge almost entirely. The illustrated photograph captures one workable balance rather than a weather pattern you can schedule. A clear day may reveal more city and coastline; a foggy day can make the nearest structure and cable geometry more important than distant detail.
Allow flexibility in the order of your photography stops. If visibility is poor from one lawful viewpoint, first consider whether a closer structural composition works. Do not chase a temporarily clearer angle across a closed road, barrier or unstable slope. The bridge remains an active transport crossing in a coastal setting, and a photograph never takes priority over the current access instructions.
Separate a viewpoint visit from walking the bridge
Photographing the bridge from its north side and walking on a bridge sidewalk are different activities. The viewpoint can show the full structure and surrounding water, while an on-bridge photograph brings cables, railings and movement closer to the camera. Choose your intended result before deciding how much walking or transport to build into the stop.
The Golden Gate Bridge district’s pedestrian information provides current sidewalk arrangements and alerts. Check it close to the visit, since construction and lane configurations can affect access. Do not assume that a path open to cyclists has the same arrangements for pedestrians, or that an attractive evening photograph proves public access at that hour.
Plan for wind and limited space
The bridge and nearby viewpoints can be windy. Keep straps, hats and small accessories secure, and avoid putting a bag on an edge while changing equipment. On a shared path, make a photograph efficiently and step out of the flow before reviewing it. A wider angle does not justify leaning over a barrier or taking up the full pedestrian width.
The district’s directions and parking guidance warns that visitor parking is limited and recommends considering other ways to reach the bridge. Use that information to plan a realistic arrival rather than circling for an unconfirmed space while the light changes. Your chosen transport should also suit the route back after the photography stop.
Build a viewpoint visit around one clear photographic aim
For a short visit, choose one principal result before you travel: the span in its setting, a cable pattern or the experience of walking beside the structure. Make the simplest version of that image first when you reach an authorised position. This provides a useful record even if fog thickens or the available space becomes busier. You can then experiment with a different balance of tower, water and background without making the whole visit depend on a fleeting view.
If you intend to walk on the bridge as well, treat that as another stage of the outing. Check the district’s current pedestrian arrangements and identify the return route before concentrating on pictures. A photograph made while standing at a viewpoint and one made on a shared sidewalk have different practical limits. At the latter, the space around the camera is part of the decision: people need to pass, and movement can change the scene while you are reviewing an earlier frame.
Keep a useful alternative ready for reduced visibility. A near tower emerging from fog can still describe the bridge, while a much wider frame may no longer communicate clearly. If the structure disappears entirely, use the stop to understand the setting and move on when appropriate. The reference photograph’s partly clear view is an example of one successful arrangement in 2019, not a condition that visitors should feel obliged to wait for.
Create a sequence with distinct purposes
Begin with a bridge-and-water view, then try a tighter relationship between tower and cables. If you also make an on-bridge photograph during permitted access, caption it as a separate perspective. These images explain different aspects of the place. Repeated crops of the same reference frame do not become new photographs and should not be reused across the USA guide as if they were.
The source date is August 2019. Lighting, fog and visible access features in that image are historical observations. Current pedestrian arrangements, viewpoint closures and commercial-shoot requirements must come from their relevant authorities. Retaining the image’s actual north-side subject makes it useful without claiming first-hand travel experience or an exact camera setup.
Continue planning your USA trip
Sources and further reading
- Golden Gate Bridge district — Bikes and pedestrians
- Golden Gate Bridge district — Directions and parking
FAQ
Is the exact north-side camera position verified?
The source identifies the bridge from the north side, but the page does not assign it to an unverified turnout. Choose a currently authorised viewpoint and follow its signs.
Can I use pedestrian and cycle access interchangeably?
No. Check the bridge district’s current arrangements for the activity you intend to undertake. Access can differ between pedestrians and cyclists.
Will August always give this amount of fog?
No. The photograph records one moment in August 2019. Visibility varies, and the composition should respond to the conditions you encounter.