USA TRAVEL GUIDE
Chicago Skyline Photography from the Adler Planetarium Lakefront
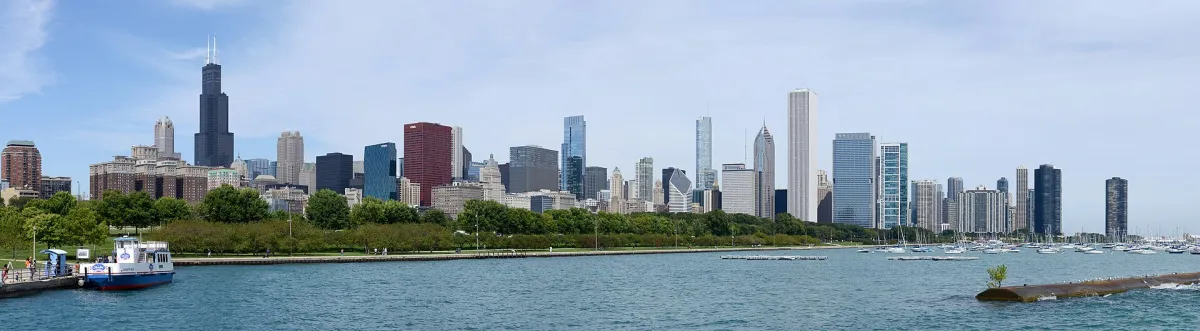
Chicago’s skyline appears as a long band of towers above Lake Michigan in this photograph, made from near Adler Planetarium on 18 September 2016. The open water and broad sky make the city’s outline the main subject. This page focuses on the lakefront perspective, which is visually different from a river cruise or a photograph taken inside the downtown street grid.
Read the full skyline as a single shape
The panorama works because the buildings are read together before individual architectural details. The shoreline gives the city a clear base, while taller towers interrupt the lower roofline at intervals. Start by looking at the two ends of the skyline: cropping one side too tightly can make the whole arrangement feel unbalanced even if the central buildings remain sharp.
The reference uses a very wide natural image ratio. It should be shown without stretching or forcing it into a standard rectangular crop. When making your own photograph, compare a wide establishing view with a narrower section that has a clear architectural rhythm. A narrower composition can be more effective on a phone screen than a panorama that reduces every tower to a tiny mark.
The skyline is not the only horizontal line in the reference. A strip of trees and the lakeside path sit between the towers and the water, while a low structure enters from the lower right. At left, a vessel and people provide a closer scale. Compare how each edge contributes before making a crop. Removing the entire near foreground would produce a cleaner skyline band, but it would also reduce the sense of being on the lakefront. Keeping a small, intentional near element can make the viewpoint more readable without letting it become the subject.
Find a lakefront viewpoint suited to your visit
Choose Chicago includes the area in front of Adler Planetarium among its skyline viewpoints. The setting helps separate the downtown towers from their surroundings. Confirm the current pedestrian approach and any event arrangements before arriving, especially if you are combining the stop with a museum visit.
Treat the lakefront as a shared space. Keep walking and cycling routes open, and do not climb barriers or step onto wet or restricted shoreline surfaces for a lower angle. A public exterior photograph and entry to a museum are separate activities. The source photograph does not establish present building admission, opening hours or permission for a large organised shoot.
For a short visit, decide whether the main goal is the full silhouette or a particular grouping of towers. The black, antenna-topped mass towards the left and the taller light-coloured forms farther right give the panorama an uneven rhythm. Look for a grouping with breathing room around its highest point, rather than applying the same crop to every part of the city. If you also have a museum booking, put a clear limit on the outdoor session so that searching for one slightly better angle does not turn into a rushed arrival at the next activity.
Choose a relationship between water, sky and buildings
A calm surface can give the skyline a quiet base; visible ripples or passing vessels create a more active city portrait. Decide how much water the image needs. A large plain foreground can emphasise distance, but it can also make the skyline feel too small. Lowering or raising the camera slightly changes the balance without requiring an extreme viewpoint.
Light can change the city’s apparent depth. Strong contrast brings out silhouettes, while more even daylight reveals differences between neighbouring buildings. Cloud shapes may help frame the tallest towers or pull attention away from them. If the sky has little interest, consider a tighter skyline band rather than waiting for a dramatic effect that may not arrive.
The foreground water has enough surface texture to remain distinct from the pale sky. On a flatter day, a similar amount of plain foreground may contribute less, so adjust the balance to the conditions rather than following the reference’s proportions mechanically. Conversely, wind-shaped water can become an important part of a lakefront picture. Make a version that acknowledges it, then compare a tighter architectural image. A long skyline frame asks the viewer to read across the width; a nearer lake detail can provide a different second image without repeating the same panorama.
Make the wind part of your planning
The exposed lakeside setting can feel quite different from downtown streets. Keep clothing, small accessories and camera straps secure, and avoid setting loose items along the waterfront edge. Check the conditions close to your visit rather than assuming that an attractive September reference represents every season. A shorter comfortable session is more productive than staying exposed after conditions deteriorate.
If wind or shoreline conditions make a broad photograph awkward, look for a sheltered alternative elsewhere on your day’s route. A view from within downtown will describe the density and height of the buildings in a different way. It should be labelled as a different perspective, not used as evidence that the Adler lakefront view can always be reproduced.
A lakefront route may include pedestrians, runners and cyclists moving at different speeds. Before stopping, look behind as well as towards the skyline, then choose a position that allows movement to continue. Hold the camera securely when turning or moving between compositions. If the exposed edge is uncomfortable, shortening the session preserves more choice than persisting until the return becomes unpleasant. A street-level architectural photograph taken later in the day is a useful complement, even though it cannot substitute for or prove access to this particular open-water view.
Use the reference as a dated city portrait
The skyline records September 2016. Chicago’s buildings and lakefront arrangements can change, so the picture is not a current inventory of towers. Its specific contribution is to show the relationship between Museum Campus, open water and the downtown skyline. That focus distinguishes this photo page from general Chicago sightseeing coverage.
For a varied sequence, make one full skyline image, one tighter grouping of towers and one frame that deliberately includes people or a vessel for scale. Keep those choices purposeful. A dozen nearly identical panoramas are less informative than a small set explaining both the city’s outline and the experience of standing beside the lake.
When selecting the sequence afterwards, compare what remains clear at the intended viewing size. The full panorama establishes the skyline’s extent, but the tree line, boats and nearest people can become too small to communicate individually. A companion frame with a simpler group of shapes can solve that problem. Keep the original wide image’s proportions intact when displaying it as a reference. For your own crops, choose the borders around the visual relationship you want to explain and retain the necessary source and alteration credit whenever you reuse someone else’s licensed photograph.
Continue planning your USA trip
Sources and further reading
FAQ
Is the reference a Chicago River view?
No. The source places the photographer near Adler Planetarium on the Lake Michigan lakefront. River-level architecture photographs have a different viewpoint and purpose.
Must I enter Adler Planetarium to understand this view?
The photograph is an exterior lakefront perspective. Museum admission and current outdoor access arrangements should be checked separately.
Can I show the photo in a taller crop?
You can make a deliberate crop where the licence permits, but do not stretch the image. A crop changes the skyline balance and should preserve the intended subject.