NORWAY · OSLO GUIDE
Oslo Photos & Photo Spots: Best Views, Light & Routes
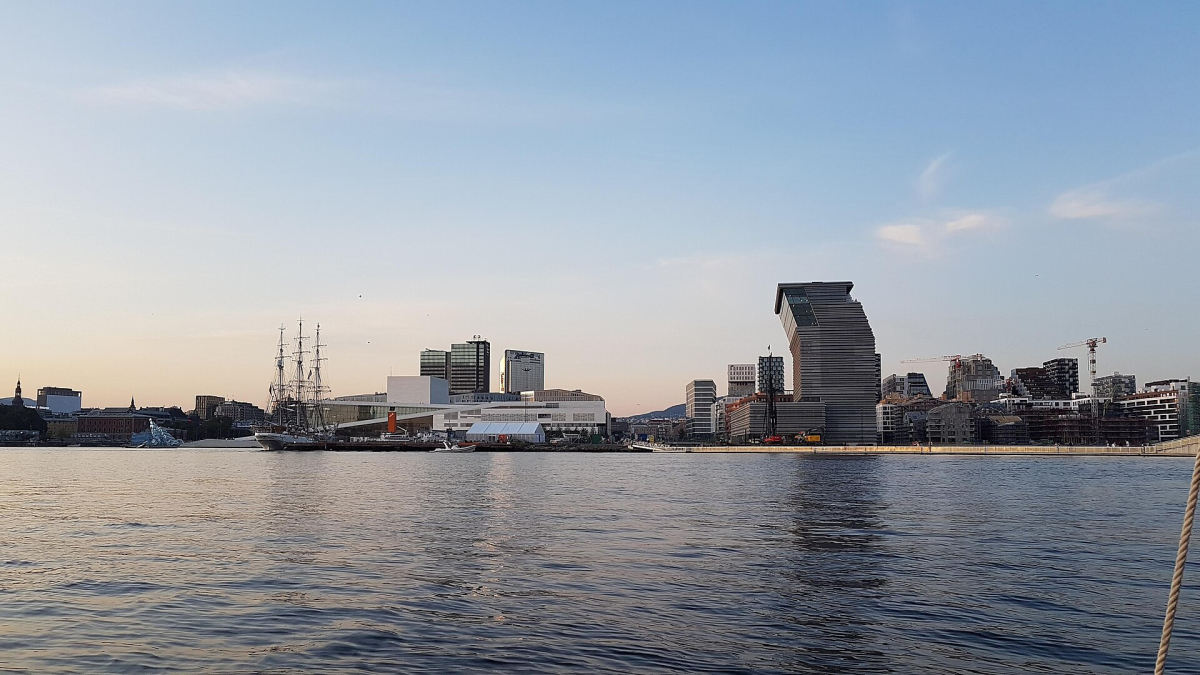
Oslo rewards a photo plan built around light and a few connected places. White waterfront architecture, sculpture, wooded viewpoints and older residential streets need different conditions. Choose one main subject for sunrise or dusk, then use the rest of the day for nearby details rather than trying to reach every landmark at the same time.
Access and photography sources checked: 18 October 2026. The light suggestions and walking allowances below are editorial planning advice. They are not promises of clear skies, empty scenes or permission for a professional shoot. Six existing photo studies provide closer composition readings without repeating their images here.
Choose Your Photo Stops
| Subject to photograph | Useful light and starting point |
|---|---|
| Opera House | Early light or evening twilight; walk from Oslo S. |
| Bjørvika, Deichman and MUNCH exterior | Morning architecture or dusk reflections; Oslo S / Bjørvika. |
| City Hall and harbour | Low light or evening colour; Nationaltheatret / waterfront. |
| Royal Palace approach | Early morning or soft cloud; Nationaltheatret. |
| Vigeland Park | Early light, late light or overcast sculpture detail; Vigelandsparken stop. |
| Akerselva and Nedre Foss | Soft cloud for water and vegetation; Grünerløkka / Olaf Ryes plass. |
| Damstredet and Telthusbakken | Quiet daylight and soft contrast; walk from St. Olavs plass or the river area. |
| Ekeberg skyline | Scout in daylight, photograph toward dusk; Ekebergparken tram stop. |
Use the Ruter journey planner for the actual date and departure, including disruptions and the final walk. The Map & Neighbourhoods guide places the areas in context. The stops below describe photographic decisions; the Attractions guide covers the wider decision to visit each place.
1. Opera House: Sloping Lines and Evening Reflections
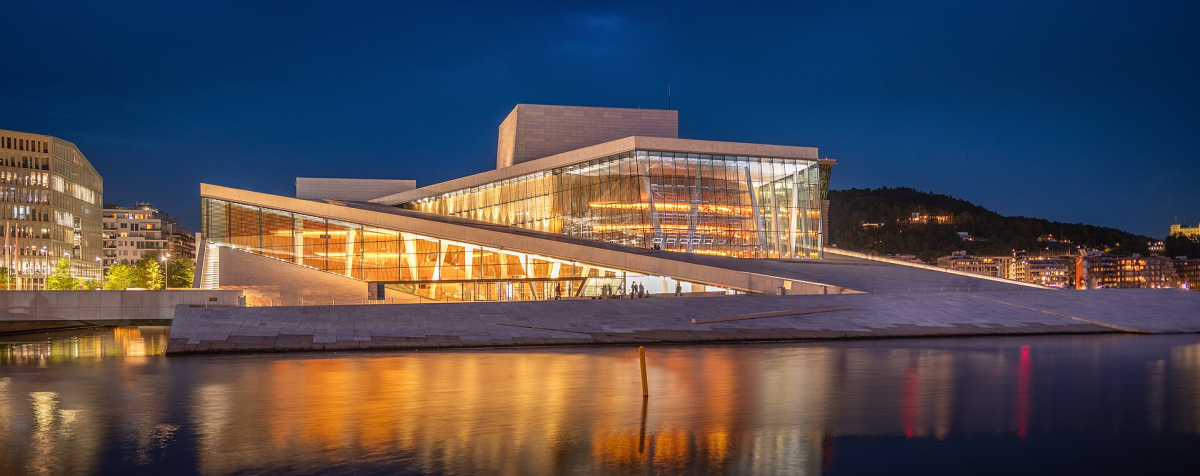
Frame: start on the public waterfront with the building’s roof planes and glass foyer in the same composition. A little distance makes the relationship between the architecture and water easier to show. Look for a clean foreground and a safe place to stop; reflections change with wind and passing boats. A view across the water and a view from the roof are different subjects, so choose one before the best light arrives.
When: try the first hour after sunrise for a quieter architectural frame, or arrive roughly 45 minutes before sunset to explore positions before twilight. For illuminated windows against a blue sky, stay while the sky and building brightness are still balanced; do not wait automatically until complete darkness. These are starting windows, not fixed daily clock times.
Getting there and rules: walk from Oslo S / Jernbanetorget to the Opera waterfront, allowing about 10–15 minutes with normal walking conditions. The Opera’s own policy permits private-use photography outside, on the roof and in the foyer during opening hours. Commercial or brand work requires an agreement; editorial work has a separate contact route. Follow roof closures and avoid slippery surfaces. For a closer composition reading, see the Opera House photo study.
2. Bjørvika: Deichman, Barcode and the MUNCH Waterfront
Frame: choose between close architectural geometry around Deichman Bjørvika, the repeated vertical forms of Barcode and a wider waterfront composition with MUNCH. Use a person for scale only when it adds to the picture and can be done considerately. Move your position to separate overlapping buildings rather than relying on an extreme crop. Keep the horizon deliberate when the water takes up much of the frame.
When: morning is a useful starting point for a quieter walk; evening twilight works for lit façades and reflections. On a bright day, look for details in open shade or deliberately use strong shadows. Clouds can make pale surfaces easier to expose without losing detail.
Getting there and rules: continue on foot from the Opera House; allow roughly 20–40 minutes for several exterior positions, with more time for photographs. Keep cycle routes and entrances open. An exterior walk does not establish permission to photograph indoors. MUNCH welcomes photography without flash in its exhibitions; ask staff about equipment or restrictions affecting the particular display before setting up.
3. City Hall, Aker Brygge and Tjuvholmen
Frame: use the City Hall towers as a clear landmark, then decide how much harbour activity belongs in the foreground. The public waterfront offers boats, mooring lines and moving people; not every element needs to fit in one frame. Continue toward Aker Brygge or Tjuvholmen for a different relationship between modern buildings and the fjord.
When: lower light can give brickwork and the harbour more depth; evening colour is a useful option when the weather cooperates. A grey day can suit a quieter waterfront series with details and reflections. Work one section well instead of rushing from Bjørvika across the city during the same brief twilight.
Getting there and rules: start from Nationaltheatret and walk toward City Hall and the quays, allowing around 10 minutes before photo stops. Leave ferry queues, boarding routes and working areas clear. This recommendation concerns public exterior viewpoints; check current access before planning interiors or murals. The City Hall photo study explains the towers and harbour context.
4. Royal Palace: The Approach and Park Setting
Frame: approach through the public setting and decide whether the subject is the façade, the rise above Karl Johans gate or the relationship between the palace and park. A wider frame can explain the place better than a close view containing only windows and columns. Use paths and permitted areas rather than planting beds to change your angle.
When: early morning is a useful starting window for fewer pedestrians; light cloud can soften the contrast across the façade and trees. Seasonal foliage changes the view, so use the scene you find rather than expecting the flowers in a historical photograph.
Getting there and rules: walk uphill from Nationaltheatret, allowing around 10–15 minutes before setting up a frame. Follow security instructions and barriers. Photography is not permitted inside the Royal Palace, according to the Royal Court’s visitor guidance. Exterior photography and the separate seasonal interior tour are different activities. Continue with the Royal Palace photo study.
5. Vigeland Park: Fountain, Figures and the Main Axis
Frame: choose the fountain’s broad horizontal forms, a figure in relation to the surrounding space, or the progression toward the Monolith. Move between wide context and a carefully selected detail. Keep other visitors’ movement in mind; an empty-looking image is not a reason to obstruct steps or ask people to leave a public route.
When: early or late light can describe sculptural form; overcast conditions can be easier for subtle surfaces. Snow and bare trees create another kind of image, but winter steps and paths need extra care. Do not assume the fountain water will operate in the season you visit.
Getting there and rules: use Vigelandsparken as the stop or destination in Ruter. The official visitor page lists tram 12 or bus 20; recheck the current service. Allow 15–25 minutes to move along the installation before adding photography time. The adjacent museum is a separate visit: its private-photography policy prohibits tripods, flash and other artificial lighting. Do not apply that indoor rule as a claim about every outdoor park setup. See the separate fountain and Monolith and park studies.
6. Akerselva and Nedre Foss: Water, Paths and City Texture
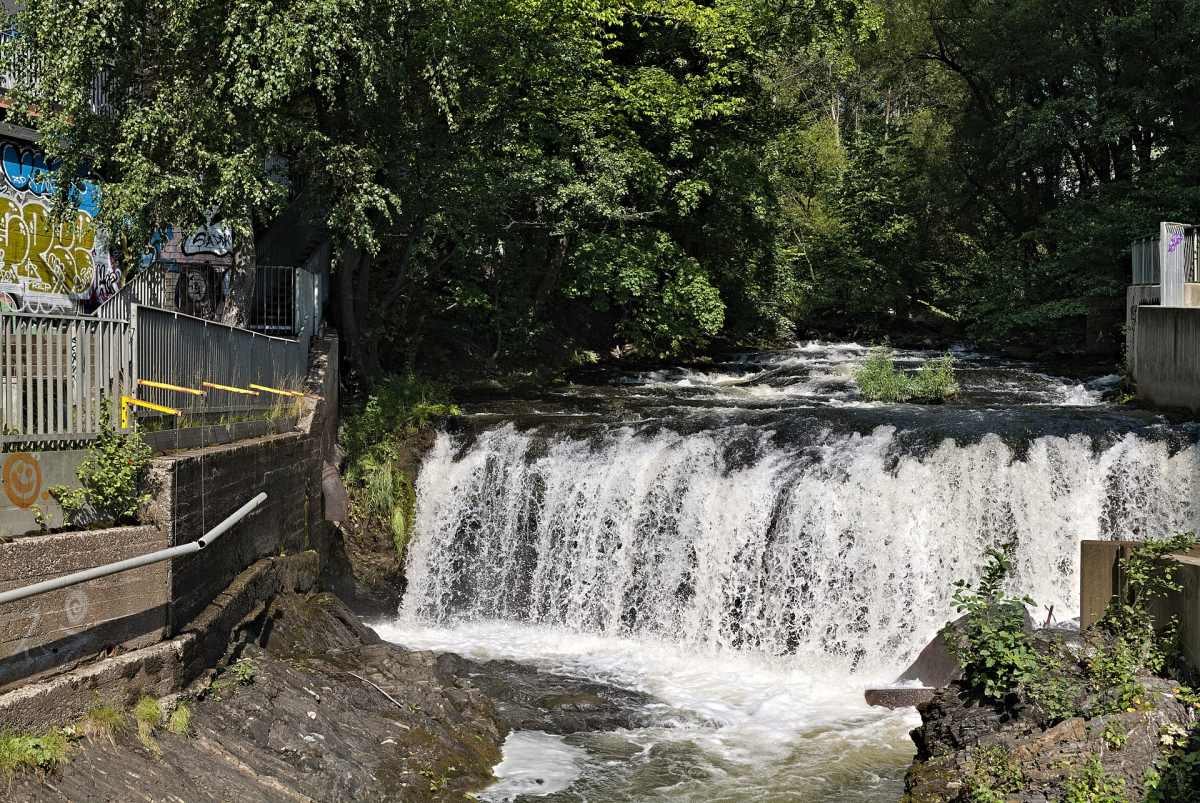
Frame: around Nedre Foss, use the waterfall, river corridor and surrounding urban detail to show a different Oslo from the harbour. Stay behind barriers and on a secure path. A waterfall detail can work without including every building, while a wider view explains how the river fits into Grünerløkka.
When: soft cloud is often useful for balancing bright water and shaded vegetation. Strong midday sun can create a large contrast difference. A slower shutter can change the appearance of water, but only use a stable setup where it is permitted and does not obstruct the path; a handheld image is a valid alternative.
Getting there and rules: plan to Nedre Foss park or the Grünerløkka area, with a walk from Olaf Ryes plass or Vulkan. The municipality’s park page identifies the setting. Allow 30–60 minutes for a compact riverside series. Do not climb into channels, cross a barrier or assume the water level and footing in a photograph match today’s conditions.
7. Damstredet and Telthusbakken: Photograph a Living Neighbourhood
Frame: look for the rhythm of wooden façades, the slope of the lane and the relationship between houses and gardens. These are lived-in streets, not a studio set. A wider streetscape can show character without making a private window, doorway or resident the main subject.
When: quiet daylight and soft contrast are useful starting conditions. Bright sun can leave one side of a narrow street in deep shade, so adapt your angle or return later rather than insisting on one fixed “best” hour.
Getting there and rules: the official VisitOSLO listing identifies the two preserved residential streets. Walk from St. Olavs plass or combine them with a river-area outing; allow 30–45 minutes including the connecting walk and photographs. Keep to public routes, leave doorways clear and ask before taking a close portrait. Do not move a resident’s belongings or enter a garden to improve the composition.
8. Ekeberg: Skyline Layers and Twilight
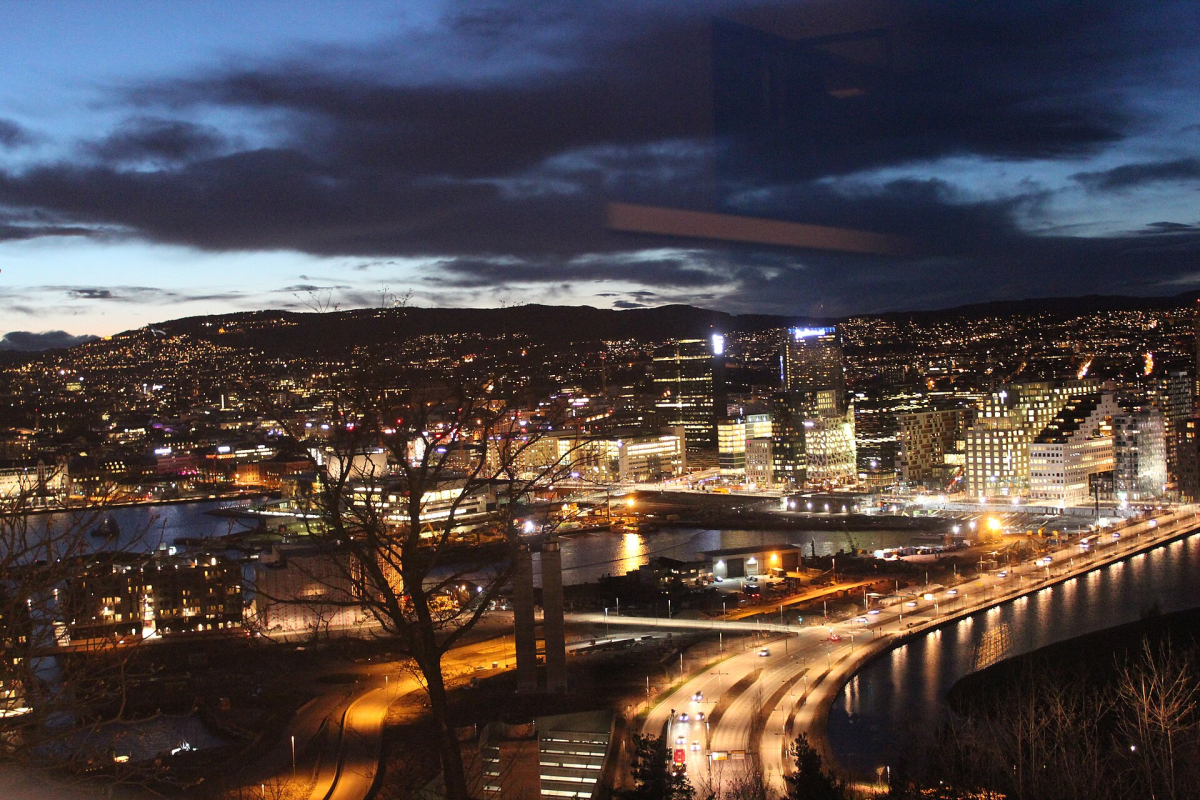
Frame: use a permitted viewpoint to layer the city, waterfront and hills. The ridge offers different sightlines: a photograph labelled “from Ekeberg” does not prove one exact tripod position. Scout the view in daylight and check what vegetation, construction or barriers affect it now. The historical image above shows an earlier stage of Bjørvika, not today’s complete skyline.
When: late afternoon is useful for finding a safe position and route back; dusk can bring together city lights and colour in the sky. Wind, cloud and rain can matter more than the published sunset minute. If the route or footing is unsuitable after dark, choose a lower waterfront viewpoint instead.
Getting there and rules: Ekebergparken’s current arrival page lists tram 13 or 19 toward Ljabru, stop Ekebergparken, about 10 minutes from Oslo S. It also flags Kongsveien roadworks during May–November 2026 while advising that trams run normally. Recheck Ruter and the final path before travelling. Allow about 20–40 minutes for daylight scouting, plus your chosen light window. For professional work, the park’s photography guidance requires park and municipal permission; use of artworks can need separate rights clearance. Public access does not remove those requirements.
Ideal Shooting Times Change With the Season
Use the first hour after sunrise and the last hour before sunset as useful starting windows for low light, then check its actual direction at the subject. For illuminated architecture, work through twilight while the sky still holds detail. An overcast middle of the day can be preferable for water, foliage and sculpture. These are photographic choices, not a single citywide timetable.
| Example date / local zone | Sunrise | Sunset |
|---|---|---|
| 21 June 2026 · CEST | 03:53 | 22:43 |
| 18 October 2026 · CEST | 08:03 | 17:59 |
| 21 December 2026 · CET | 09:18 | 15:12 |
Solar data: MET Norway Sunrise 3.0, calculated for central Oslo at approximately 59.91° N, 10.75° E; MET Norway data licence. These are dated astronomical examples in local time, not weather forecasts or predictions of when sunlight clears a particular building or hill. Check your own date, forecast and route access. A summer sunrise can be earlier than normal transport or indoor opening hours.
Turn the Stops Into a Realistic Photo Outing
Architecture evening: start in Bjørvika, study Deichman and the surrounding buildings, then stay near the Opera or waterfront for changing light. Allow around two to three hours with unhurried photography. Do not promise yourself both a full MUNCH visit and several distant sunset viewpoints in the same short window.
West and park day: begin at the Palace approach, photograph the harbour around City Hall and use public transport to Vigeland Park if you want sculpture later. Allow a half-day or more, depending on walking pace and the photographs you choose to make. The best order changes with the day’s light.
River and skyline: photograph Akerselva or the older streets in daylight, then use public transport for a separately planned Ekeberg evening if the weather and access suit you. Build transfer time into the plan; Ekeberg is not a riverside extension of Grünerløkka. These allowances are editorial estimates, not official tour durations.
Tripods, People, Drones and Published Images
Check the rule for the specific venue and intended use. Private holiday photography, editorial work, a paid portrait session and commercial location hire may have different conditions. Permission to enter a building is not permission to use a flash, tripod, lighting rig or drone there. If you need equipment beyond a handheld camera, contact the venue in advance rather than assuming a generic citywide permit.
Leave public movement unobstructed. Respect a person who objects to being the subject of a photograph, take particular care with children and consider the separate rights involved before publishing identifiable portraits or artwork. A source image’s licence permits reuse only within its terms; it does not grant access to the location or every right connected with the subject.
For drones, use the Civil Aviation Authority’s visiting-pilot guidance, current airspace restrictions and the land manager’s instructions. No photo stop on this page establishes permission to fly. The Responsible Travel guide covers shared-space and nature considerations.
Six Photo Studies and How to Use Them
The linked studies concentrate on individual compositions: Opera House geometry, City Hall and harbour, Palace approach, Vigeland’s fountain, Monolith and park, and a street-transport scene. The bus photograph is a visual study, not a current route or vehicle guide.
Displayed photographs have visible creators, sources and licences. Their dates describe the images, not current weather, crowding or access. Photos4Travel does not claim to have taken them or personally tested each setup. Use Itineraries for the wider visit and Best Time to Visit for seasonal context.